
Soon — hopefully next week — Apple will release new versions of all of its operating systems including macOS. Over the past week, I upgraded my 2017 MacBook Pro with Touch Bar to macOS 10.13 High Sierra with hopes that the latest and greatest beta (#8) would be stable and ready to go. High Sierra is running on the MacBook Pro…but not without some issues along the way. Here are five tips that should help you prevent some of the issues that I ran into.
#1 – Make Sure You Have A Bootable Backup
Yeah, I know we constantly harp about making sure you have up to date backups, but if there’s any time that you should have a good backup, it’s when you’re about to do a major system upgrade.
If things go south with your High Sierra upgrade, the only thing that might save your bacon is having a bootable backup. The best possible solution for doing that is to use Carbon Copy Cloner 5 (US$39.99, less for previous owners), which is new from Bombich Software. Not only does it create bootable backups, but it also backs up the recovery partition of your drive!

#2 – Make Sure macOS 10.12 Sierra Is Up-To-Date
Any Mac that can run macOS 10.12 Sierra can also run macOS 10.13 High Sierra. If you are running Sierra, there’s a good chance that you want to upgrade to High Sierra when it arrives. You can make sure that you’re running the current version (10.12.6 as of September 6, 2017) by selecting About This Mac from the Apple menu:

If it isn’t up to 10.12.6, fire up the Mac App Store from your Mac Dock and check the Updates tab to see if there is an update you haven’t installed.
#3 – Make Sure Your Mac Apps Are Updated
Do you know if your Mac apps will run properly under macOS 10.13 High Sierra? Many developers have been hard at work since the Apple Worldwide Developer Conference in June ensuring compatibility with High Sierra and adding new features as warranted, but others may have been slacking…
Some apps update through the Mac App Store and the Updates tab, others have built-in updaters. For example, I use TextExpander to ease my writing, and it has a Check for Update item under the TextExpander menu. It also warns me of updates whenever it finds one available, then lets me update with a click. Some other apps check for updates whenever they’re restarted, and others like Google Chrome not only check for updates, but can install the updates automatically.
#4 – Disable Login / Startup Items Before Upgrading
If you’re like me, you probably have some apps or utilities that are started automatically whenever you start up your Mac. Sadly, it was one of those apps that caused an issue with my beta 8 upgrade of my MacBook Pro last week.
During the upgrade, there were some odd pauses and finally the upgrade ground to a halt at one point. After waiting a half-hour, I force-rebooted the MacBook Pro. It came up as normal, I saw the login screen, and logged in. Then things went downhill quickly…
As usual, I could see startup apps loading, but before I could use the MacBook Pro, the screen would get “covered” by a dark translucency and the keyboard and trackpad appeared to be unresponsive.
After numerous forced reboots, I noticed that it was probably a screenshot utility that I’ve used for years. That screenshot utility is from a longtime Mac developer who doesn’t seem to keep up with updating his apps much anymore, and it appeared that the screenshot app was starting up in a “full-screen screenshot” mode. It grayed out the display and didn’t respond to keyboard or trackpad input.
I tried a number of things to keep the app from loading during startup, and finally I did something I should have tried first — Command-Q. Yep, I was able to Quit the app, and I deleted it ASAP. Now this app has a setting for starting up at login, so I could have simply gone into the app and unchecked that setting.
Other apps use the macOS Login Items controls to load when you log into your Mac. You can find those under System Preferences > Users & Groups > Login Items:
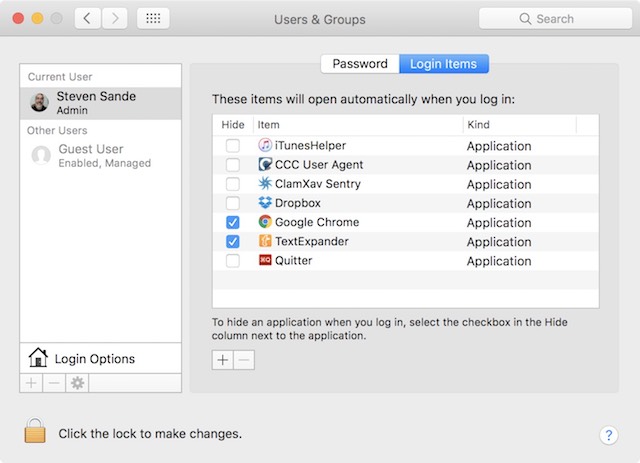
Take note of which apps load automatically at login, then delete all of them except those that are provided by Apple — iTunesHelper, for example — which will presumably be running fine in macOS High Sierra.
After you’ve successfully upgraded your Mac, you can start adding those items back one at a time, rebooting after each addition to ensure that the app doesn’t conflict with the startup or login process.
#5 – Think About Waiting Before Upgrading
OK, I know you’re really, really excited about High Sierra, but unless you absolutely need to upgrade to it the first day it’s available, consider waiting awhile…
High Sierra has been tested very thoroughly by now, having gone through eight developer and public betas. However, that doesn’t mean that users won’t have problems with the upgrade. A few years back when I was writing for TUAW, I did an iOS upgrade immediately after it was released. Guess what? It bricked my iPhone. Fortunately, many others were in the same boat and it was only a matter of hours before Apple fixed the problem and came out with a revised upgrade.
If I had one recommendation to make about upgrading to macOS High Sierra, it would be to wait a few days to see if others are having issues. If things appear to be going smoothly for the vast majority of Mac users, then it’s probably going to be OK for you as well. But if reports are showing a lot of issues right off the bat, you’re going to be happy you waited.


