Back to school means much more than getting new clothes, notebooks, and a box full of unused Crayola crayons. For a lot of students, it’s time to get a computer of some sort, and what better computer than a MacBook? But for parents on a budget, dropping at least a thousand bucks on a new MacBook is out of the question. Never fear, since it’s pretty easy to take even an old MacBook and update it so it’s a perfect school computer.
The perfect student Mac: A MacBook
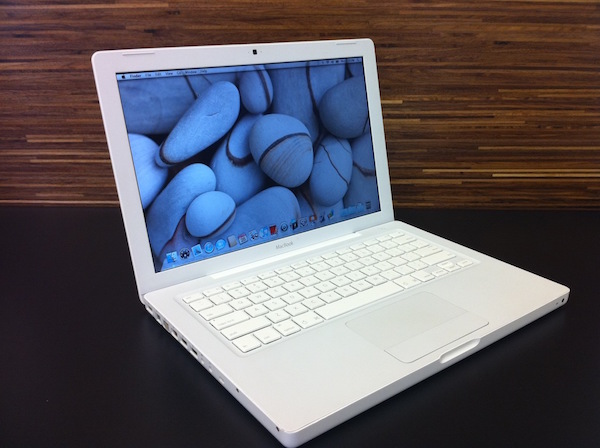
A perfect Mac for a young student is a 2007 – 2009 MacBook with an Intel processor. That’s a key point; in order to run recent versions of Mac OS X, you’ll want to make sure that the MacBook has an Intel processor and not a G4 or G5 CPU. Old MacBooks available online from resellers for as little as $180, and usually require very little work and money to bring them up to speed.
Why a MacBook and not an iMac or Mac mini? It all has to do with portability. Your student might want to take his or her MacBook to school, to the library, or to a friend’s house. Why tie them down to one location?
Where can you find these old MacBooks? Take a look on eBay, or try one of these resellers:
You can also find vintage MacBooks at garage sales and flea markets, but make sure that the computers have a working charger and that they boot up before spending your money.
One other tip — the connectors and cable that channel video up to the display on the MacBook and MacBook Pro are notorious for failing after thousands of open/close cycles. When you try out a MacBook or MacBook Pro, shake it lightly and move the display back and forth. If you see any flickering in the display, then the connectors and cable are probably in need of repair. Move on…
Memory
One of the more important factors to ensure that your student isn’t sitting around all day waiting for things to happen with that MacBook is to have enough RAM installed. Some of the earlier models came with as little as 512MB of RAM, and the older models came with 2GB. Those earliest models can be upgraded to 2GB of RAM, while the newest (2009) can be bumped up to 8GB.
Fortunately, it’s quite easy to install RAM in these computers. All of them had a removable battery pack; to get to the RAM, it’s just a matter of removing that pack, unscrewing three small screws, and the RAM slots are ready for bigger SIMMs.
You will need to purchase the correct RAM for the MacBook. One of my favorite places for purchasing memory and drives for older Macs has always been Other World Computing (disclosure: I also write for OWC’s blog). They have videos available showing how to replace memory and hard drives, and can also tell you what RAM to get.
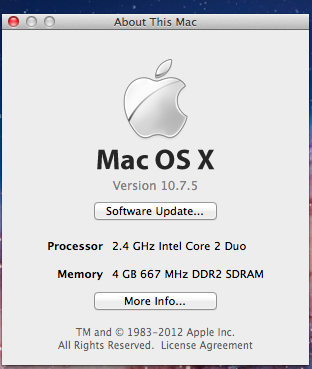
To start, you’ll need to know the model ID of your MacBook. That information and much more is available by booting the MacBook (you did remember to get one that actually boots up, right?), clicking on the Apple Menu, and selecting About This Mac.

This first screen is fairly helpful; it shows what version of Mac OS X you’re currently running, what processor is used in the MacBook, and how much RAM you currently have. Next, click on More Info.

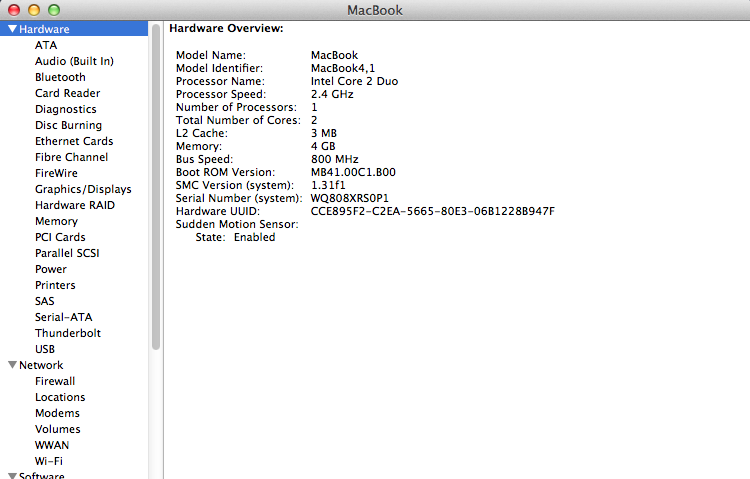
Here you get a bit more info, like the exact type of MacBook (13-inch, Early 2008), the serial number, and the name of the operating system — in this case, OS X Lion.
Clicking on System Report provides even more information. The model ID is listed near the top of the list — in this case, it’s a MacBook4,1.

On the OWC MacBook memory web page, each type of MacBook is shown along with the memory that works with units with a specific Model ID. The MacBook4,1 is listed under this image, and with a click it shows what options are available. The MacBook used in this post can use up to 6GB of RAM by removing one of the installed 2GB SIMMs and replacing it with a 4GB stick.
However, you usually want to match the RAM installed in your device — in other words, make sure that it’s from the same manufacturer. So our option is a 6GB upgrade kit ($125) that contains a matched 4GB+2GB set.
While our example device isn’t getting much of a RAM bump — just from 4GB to 6GB — that’s enough to speed things up in terms of operation. The benefits are even better when you’re going from something like 1GB of RAM to 6GB.
As mentioned earlier, OWC has videos available that show exactly how to install memory, hard drives, and optical drives for almost every model of vintage MacBook, MacBook Pro, iMac, and Mac mini. Here’s a sample page for the MacBook4,1.
Storage
The next thing to do is to add storage space to the old MacBook. You do want your budding cinematographer to be able to fill the hard drive with hundreds of gigabytes of video, don’t you? The MacBook4,1 came with a miserably small 120GB hard disk drive by default. Technology has marched on, so it’s now possible to put up to a 2TB hard drive or even a SSD (solid state drive) in the old MacBook.
Prices for storage have dropped a lot since 2008. These MacBooks use 2.5-inch SATA laptop drives. That 2TB drive is a 5400 RPM hard drive from Seagate, available for $113. Would you rather opt a speedy SSD with no moving parts for your student? For $118 there’s a 240GB OWC Mercury Electra 3G SSD available.
Replacing the drive in a MacBook is just as simple as upgrading RAM, within the capability of anyone who can use a small screwdriver. Like the RAM, the hard drive is located next to the battery pack and is easily accessible. Once again, OWC’s videos make it a piece of cake for anyone to upgrade a vintage MacBook.
Other Considerations
Other things to think about when buying an old MacBook or MacBook Pro for student use include what versions of OS X it can run and the available ports. Wikipedia’s MacBook Page is an excellent resource for determining both of these things.
Why is the OS X version important? Well, some software is written to take advantage of features only available in the latest versions of OS X, so the MacBook may be unable to run those apps if it is “stuck” at OS X 10.7 Lion. In that case, it may be best to grab a slightly more expensive — and newer — MacBook Pro or MacBook Air that can at least run OS X 10.10 Yosemite. Apple sells refurbished Macs at a slight discount with a full warranty, you can check them out here.
The ports that are available can be very important if your student has a need to use video out for presentations or wants to connect to modern peripherals. The older MacBooks have USB 2.0 ports (two of them), a Firewire 400 port, and a Mini DVI video out port. Firewire peripherals are still available, and Apple and several other vendors sell Mini DVI to VGA and HDMI adapters.
In Conclusion
With a little work and a few hundred bucks, your student can go back to school this year with a MacBook that he or she can be proud of. Do you have any favorite tips for other Apple World Today readers? Let us know in the comment section below.
