
You can save time and effort with proxy icons. If you don’t know what a proxy icon is, or you know what it is but didn’t know it was called a “proxy icon,” I’m talking about the little icon in the title bar of all Finder windows and most document windows, like these:

What’s cool about proxy icons is that they behave exactly the same as the “real” icons they represent, but are often more convenient.
It’s important to note that while Finder windows always display a proxy icon, you can’t use them in document windows until the file has been saved. Furthermore, the proxy icon will be dimmed as long as there are unsaved changes to the document.
How do you know if there are unsaved changes? Files that need saving have a black dot in the middle of their red Close buttons and their proxy icons are dimmed and un-selectable; saved files have no black dot and their proxy icons are normal—undimmed and selectable—as shown here:

Now that you know what proxy icons are, here are seven cool ways they can save you time and effort:
- Move the file or folder to a new location by dragging its proxy icon to a different folder, disk, or to the Trash.
- Make a copy of a file or folder by pressing the Option key and dragging the proxy icon.
- Make an alias of a file or folder by pressing the Command and Option keys and dragging the proxy icon.
- Add the file or folder to the Toolbar of all Finder windows by pressing the Command and Option keys while dragging the proxy icon onto the Toolbar. Tip: To remove an icon from the Toolbar, press the Command key and drag it off the Toolbar—it will disappear with a satisfying “poof.”
- Add the file or folder to the Sidebar of all Finder windows by dragging the proxy icon onto the Sidebar. Tip: To remove an item from the Sidebar, drag the item off the Sidebar until you see a little X, then, release the mouse button and watch it disappear with a satisfying “poof.”
- Drag a folder’s proxy icon onto any Open File dialog or Save sheet to display that folder’s contents in the Open File dialog or Save sheet.
- Right-click the proxy icon (or click while pressing either the Command or Control key) to see the path to the document or folder (Smart Proxy icon tricks in the figure below).
- If you release the button while a folder along the displayed path is selected.
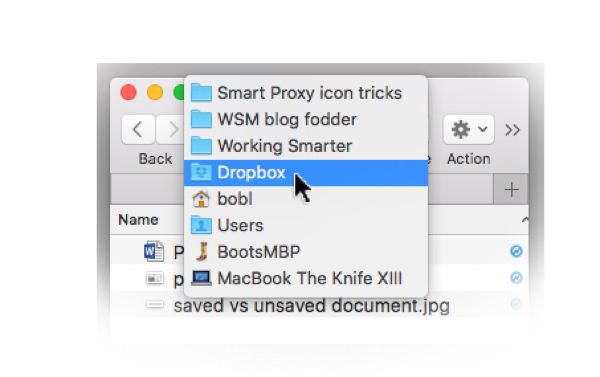
That’s nice, but if you select one of the other folders (Dropbox above) before releasing the mouse or trackpad button, that folder’s contents will appear in a new Finder window or tab, which is even nicer.
I use proxy icons almost every day and they save me time and effort every time I do. If you’re already a proxy icon user, congrats on knowing this elegant technique for moving, copying, creating aliases, and more. If this is the first time you’ve considered proxy icons, try to remember them the next time you need to move, copy, create an alias, or whatever.
This nugget of info is from my “Working Smarter for Mac Users” newsletter. You can sign up for free and get free timesaving tips, and more, every week.
Aurora HDR: The only Mac app you’ll need for High Dynamic Range photography