
What looks like a large white egg, weighs 4.6 pounds (2,100 grams), shoots 4K photos and video, and flies? Sounds like a joke, right? It’s not, but if it was the punch line would be the PowerVision PowerEgg (US$1,288), a very unique camera drone that stands apart from the usual quadcopters that are so prevalent today. As you’ll find in this review, the PowerEgg is an extremely capable drone that both new and experienced pilots should consider.
This review was also published on our sister site Drone World Today.

Design
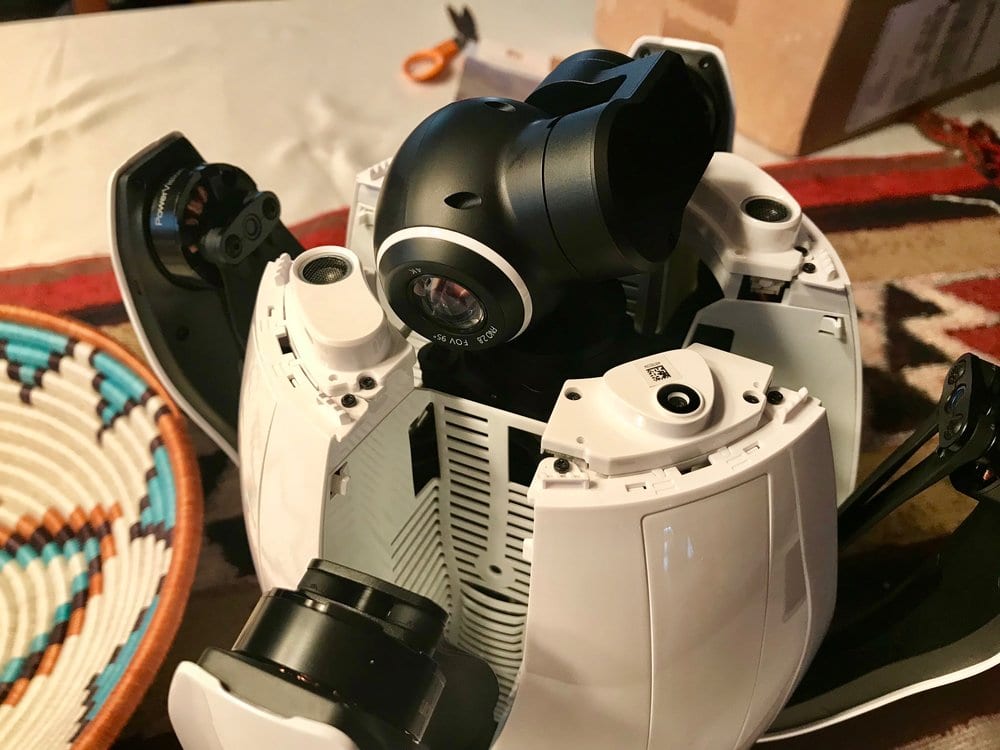
The PowerEgg is quite unique and different when it comes to camera drones. Four “arms” unfold upwards from an egg-shaped shell, with a motor pod at the end of each of the arms. Custom 10.5-inch propellers are used for thrust — this gives the drone a throaty roar when it’s moving near the surface, but the PowerEgg is actually fairly quiet when hovering at altitude.
Four power-actuated landing legs fold down from the body to keep the camera and gimbal from hitting the ground during landing. The gimbal is impressive — it’s a full 3-axis gimbal capable of easily taking 360° pano shots. That camera holds a micro-SD card of up to 64GB capacity (Class 10 or UHS-1).
On the bottom of the device are ultrasonic and visual sensors for what’s called “Vision Positioning”, mostly used for inside flight between .2 and 3.5m of altitude (.66 to 13 feet). That mode can provide vertical hover accuracy of 0.1m (about 4 inches) and horizontal accuracy of about .2m (approx. 8 inches). For outside flight, vertical hover accuracy is closer to +/- 1m (3.3 feet) and horizontal accuracy is about 1.5m (about 5 feet).

The controller is wonderfully designed. It features a standard set of joysticks and buttons that will be familiar to anyone who has flown a drone before. It connects to a base station that uses 2.4GHz Wi-Fi to communicate to the aircraft and 5GHz Wi-Fi to communicate with your smartphone. That smartphone runs the Vision+ app, which can control any of the PowerVision drones including the surface PowerDolphin water drone and PowerRay submarine drone, or the more professional PowerEye quadcopter.
The base station has built-in spring brackets for holding a smartphone or tablet; I found it worked perfectly with my iPhone X and an iPad mini.
However, there’s also another very unique controller called the PowerEgg Maestro Motion Remote Controller. It’s a gesture controller for the PowerEgg and pilots can use simple hand motions to control the flight of the drone.
Specs
The PowerEgg has three modes — Easy, Normal and Professional. When in professional mode, the PowerEgg can fly at speeds up to 13m/s (29 miles per hour), with an ascent speed of 5m/s (11 miles per hour) and a descent speed of 2m/s (4.5 miles per hour). Of course, things are much more leisurely in the easy and normal modes.
In the US (FCC), the PowerEgg can fly up to 5km (3.1 miles) away. However, pilots need to remember that they should only fly line-of-sight. I found the PowerEgg very easy to see up to about a mile away as the bright white body and big size make it
The camera shoots 4K UHD (4,254 x 3,264 pixel max) photos, true 4K UHD at 3,840 x 2,160 pixels, 2,840 x 2,160 and 2,560 x 1,920 pixel formats, and can also capture 1080p and 720p video. It uses an f/2.8 lens with an ISO range of 100 – 1600, and a 1/2.3” CMOS sensor. The lens has a 95° field of view with a 22 mm focal length.
For positioning, the PowerEgg uses both GPS and the Chinese BeiDou navigation satellite system. BeiDou is useful only in parts of Asia, so most users will be using the GPS constellation.
The Lithium-polymer battery in the PowerEgg has a capacity of 6.4 Amp-Hours for a total of 94.8 WH of energy. Each smart battery has a weight of 1.3 lb (0.59kg) which is why it’s good that they’re firmly latched under the top cover of the device — you wouldn’t want a 1.3 lb weight dropping from the skies. There’s a handy charger that can charge a battery pack, the remote controller and the base station at the same time, and bright LEDs let you know when everything is fully charged.
Flight Report
Due to weather and other circumstances, I hadn’t been able to test-fly the PowerEgg for quite a while. When the skies cleared up and temperatures were in the 50°F range, I headed to my local AMA airfield to give it a try. Fortunately, things were nice and windy for a real test of the drone, with steady breezes of about 10 mph (4.5m/s) with gusts in the 15 – 20 mph (6.7 – 9 m/s) range.
I opened the top hatch of the PowerEgg and dropped in a battery pack, making sure that it was securely latched. Closing the top, I pressed the power button (also located on top), then gave it a long press to power up the drone. To extend the landing gear, I pressed the button three times quickly (conversely, this will bring the gear up when flying is done).
With the PowerEgg sitting on the ground, I then linked my iPhone to the device using Wi-FI, then powered up the Vision+ app. It showed that it was connected, and from there I tapped the prominent “Begin Flying” button.
Now if you’ve never flown the PowerEgg before…or if you have less than a full hour of flight time…you’ll be asked to watch some getting started videos. While this is a great idea, it would be nice if the device made you watch the video once. You can also register the drone with PowerVision from the app, but due to my desire to actually get some flying done, I passed on this.
There’s also an IMU calibration that the PowerEgg needs to go through before first flight. There are three different configurations that the device is held in, then rotated counterclockwise until an app icon turns green. I found the calibration to be similar to that for DJI drones and just as fast, but the Vision+ app gives a better indication of when the calibration is done.
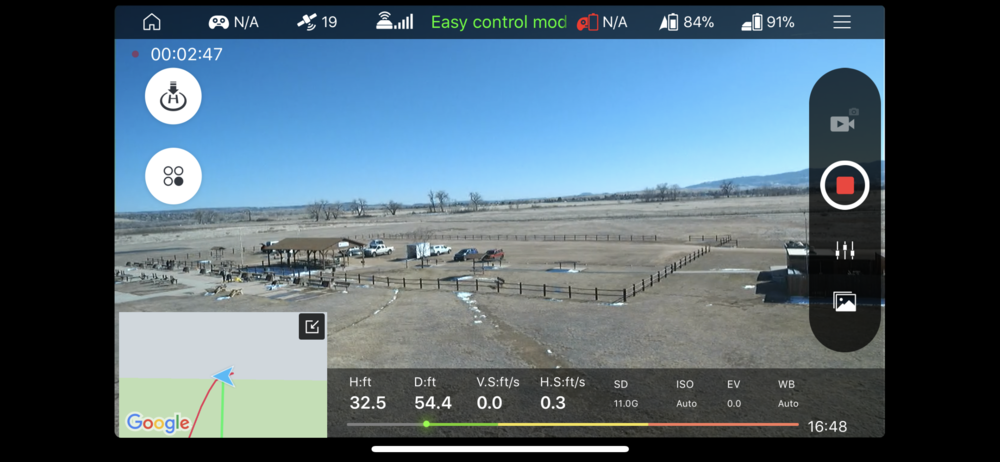
The app is similar to the DJI GO 4 app in terms of layout. I actually think Vision+ is a bit more clear in layout and operation than DJI GO. As you can see from the screenshot below, there are indicators for controller mode, number of GPS satellites, device Wi-Fi strength, control mode and battery strength on all batteries. A green/yellow/red line at the bottom of the display shows estimate battery life remaining and shows when power is getting low (yellow) or is critical.
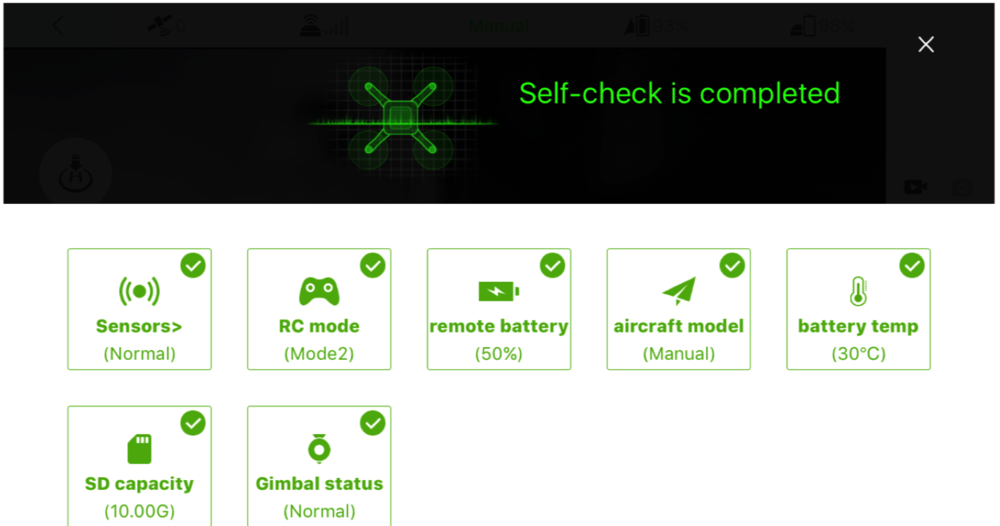
One feature I absolutely loved was the self check. As you can see from the image below, the PowerEgg goes through a full set of self checks so you can be assured that everything is ready for flight. I wish every drone did this!
The app allows the pilot to set a “safe zone”, which is perfect if you’re in an area where you know you cannot cross certain boundaries. If you pass the safe zone or maximum altitude (400 feet in the USA), the drone automatically enters the return to home mode and comes back for a landing.
I used auto-takeoff to launch the device. The standard “V” joystick gesture unlocks the motors and starts them up, then a press and hold on the controller launch button (followed by haptic response) tells the drone to fire up and go. As I mentioned, the big props tend to make a deeper sound than most drone pilots are used to. The noise would be very noticeable while flying inside or in a quiet neighborhood, but once the drone is about 100 feet away the sound is barely audible.
Once launched, the drone settles into a very stable hover about 10 feet (3.3m) above the ground and holds its position. As mentioned, it was quite windy while I was flying, but the PowerEgg barely budged. I then took the PowerEgg through a series of manual maneuvers, testing yaw, pitch and roll response. It responds quickly; one yaw spun the device around faster than I expected and that can be seen in my video (be sure to watch in 4K if you can for the best quality).
When I brought the PowerEgg up to the 400 foot maximum altitude, the app began beeping and the drone returned home. It moved laterally to a location directly above me, then began coming down at a leisurely pace — I calculated it to be about 3 feet per second, or about .9m/s. Considering I was at peak altitude, that meant that it took a little over two minutes to descend and land.
Landing was precise and soft. How precise? On one flight, I had taken off right next to the “egg cup” that holds the PowerEgg when it’s folded up. Even after battling winds for almost 20 minutes, the PowerEgg came right back and landed within an inch of the takeoff point.
While flying, I used the controller finger wheels to control the gimbal pitch and yaw. The gimbal was very smooth in response; I didn’t really need to set the speed slower, it just did a very good job of pointing precisely where I needed it.
One negative that I did see during flight was that in high pitch situations (fighting the wind to go forward, for example) at least one “arm” and prop was visible in the video frame for a moment. This does happen on other drones as well, so it’s unsurprising that it’s happening on the PowerEgg. It’s also imperative that the pilot watch for the landing gear in the image when shooting video during a return-to-home, as the gear comes down and can be in the video frame.
I flew in both Easy mode — where the aircraft is oriented so that the direction away from the remote controller (joystick up) is the front of the aircraft — and in Normal mode. I did not try the Professional (manual) mode. In both modes, the control of the PowerEgg was precise, and the drone was steady. That extra weight must make up for the larger surface area of the drone, as the wind gusts didn’t affect the flight of the PowerEgg one bit.
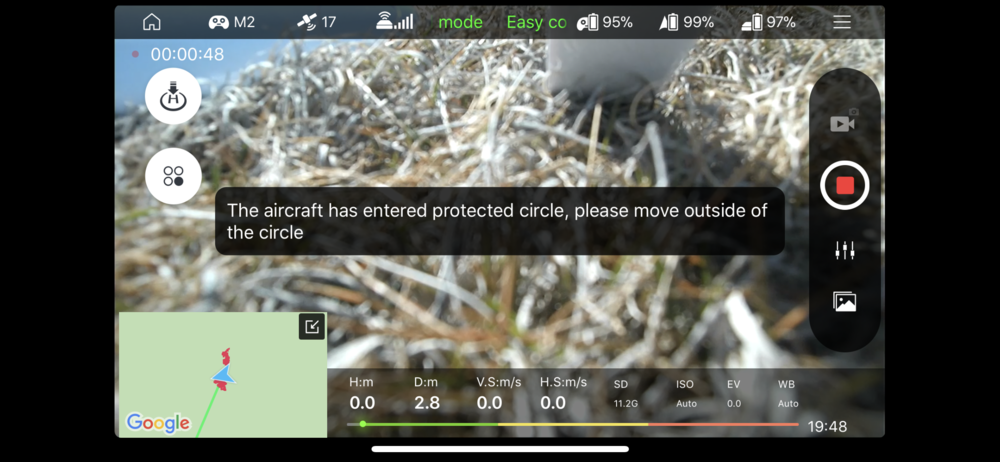
The Easy mode provides a wonderful safety feature for new drone pilots, creating a 10m (33 foot) radius safety zone with the user at the center of that circle. If the pilot is too close to the drone during takeoff or flight, a message appears on the app display (see screenshot below) saying “The aircraft has entered protected circle, please move outside of the circle”.
I was able to get about twenty minutes of flight time from each battery pack, close to the maximum (23 minutes) and excellent considering the wind conditions. Multiple takeoffs and landings were done during each flight. I did not test the Maestro gesture controller, nor did I try the orbit, selfie, waypoint or follow-me modes.
This drone really is a joy to fly. The PowerEgg is perfect for any pilot, whether a raw newbie or a polished professional.
I won’t go through all of the many other features of the PowerEgg as I want to return the loaner to PowerVision sometime this century, but let’s just say that there is much more to this drone than meets the eye. If you’re interested in the PowerEgg, I strongly recommend reading the well-written user manual (PDF download) to see what else is available.
After returning to my office, I removed the micro-SD card from the camera and then took a look at the video. I noticed that there’s a barely visible 1Hz flicker in the video; watch closely and you’ll see that about once per second things tend to almost imperceptibly brighten and darken.
However, the video quality — which is 2160p 4K UHD — is still great. The optics on the PowerEgg’s camera appear to be superior to most drones, as lens flare was kept to a minimum even when the sun was in the video frame and objects were extremely sharp.
Conclusion
The PowerVision PowerEgg is an excellent camera drone, and it surprises me that it hasn’t received the attention it should get. At $1,288, it’s a great flying machine that takes excellent video and photos, and it certainly gets attention! While most of the RC fliers at my usual “test flight” airfield ignore my drones, I had several onlookers who came over to ask about the PowerEgg. This is one drone that I am going to be sad to have to return to the manufacturer after my review is done!
Pros
- Stable flight even in moderate winds
- Auto landing gear
- Sharp, clear video and photos up to 4K UHD resolution
- Easy to fly
- Pre-flight system self-check ought to be on every drone
- Best remote controller I’ve ever used
Cons
- Pilot needs to watch for landing gear in video frame
- Barely visible 1 Hz flicker in video