
You can save tons of time and effort by using the Mail app’s Rules, which let you specify the conditions that trigger an action or actions.
So, for example, a rule can: move messages from your inbox to another mailbox; highlight messages from specific senders; automatically reply to or forward messages; and much more.
To create a rule, choose Mail–>Preferences and then click Rules. If you’ve never created a rule, you will see a single rule called News From Apple, which was thoughtfully included by the mothership so you wouldn’t have to face a blank window the first time you created a rule.
Examine the Example Rule
Let’s take a look at this rule by double-clicking it in the list of rules or selecting it and then clicking the Edit button on the right:

This sample rule adds a blue background to any message from any of the addresses shown.
- To add another address, click the + (plus) button
- To delete an address, click the – (minus) button on the right of every condition
Make Your Own Rules
Let’s create a new rule to move new messages from a specific sender (my editor in this example) to a specific mailbox (Urgent in this example).
I began by clicking the Add Rule button, then I added two conditions to trigger the rule: From is equal to editor1@editors.com and From is equal to editor2@ editors.com.
Next, I specified what to do with messages that match either condition: Move message to mailbox Urgent.
Here’s what the rule looks like:

When I click OK, a dialog appears:

If I click Apply, my Active Rules are applied to currently selected mailboxes; if I click Don’t Apply, the Rule is saved and activated but not applied to selected mailboxes. From now on, this rule will move messages from either of my editors from my inbox to the Urgent mailbox.
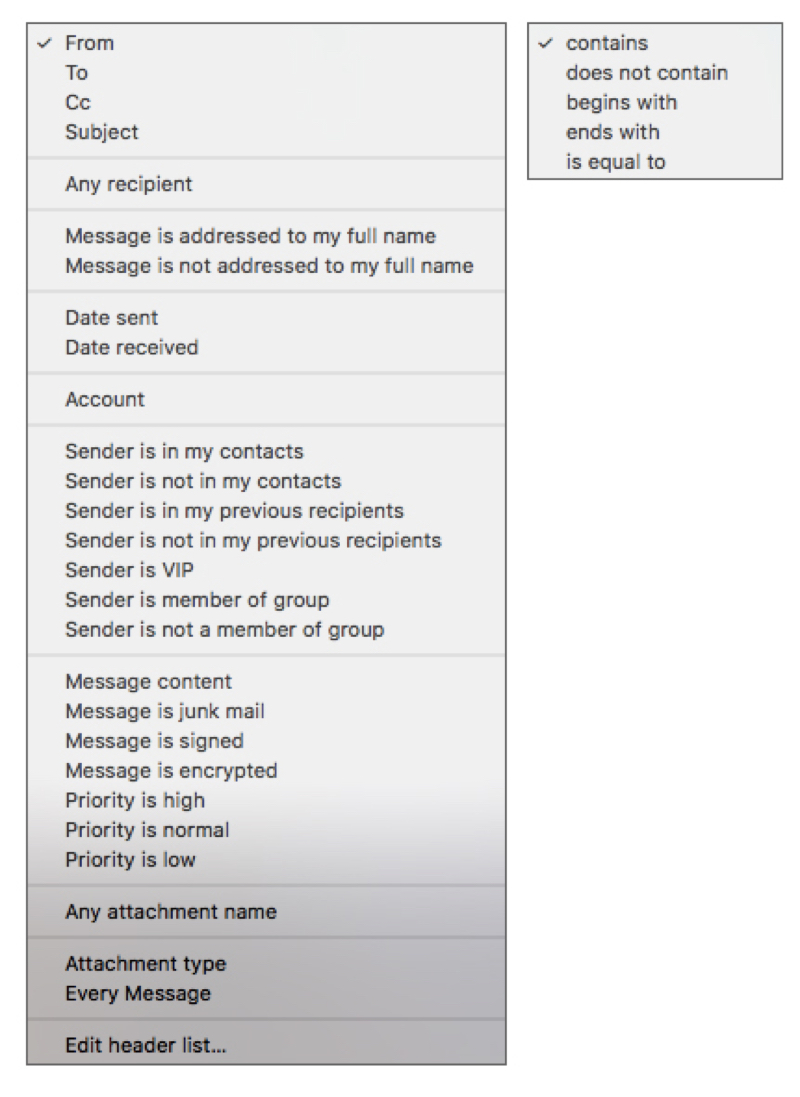
You can specify more than a dozen different conditions in the dropdown menu on the left (left in the figure below), and use any of the five options in the dropdown menu in the middle (right in the figure below):
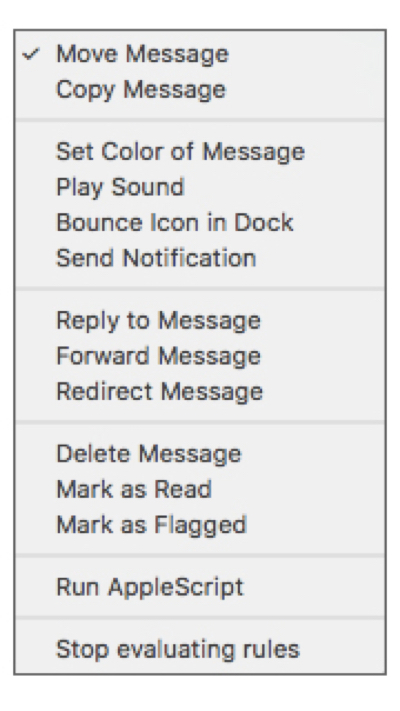
The dropdown Actions menu (below all of your conditions) includes more than a dozen things your rule can do after it meets your specified conditions:
(Robert’s) Order of Rules
Everything you’ve seen about rules so far—creating a new one, and choosing conditions and actions—has been fairly straightforward. But if you have more than two rules, their order matters. You see, Rules are executed sequentially in the order they appear in the Rules window (in Mail –> Preferences). So the first rule in the list executes first, then the second rule, then the third, and so on. To change the order of your rules, just click and drag on a rule and move it up or down in the list.
When you have more than a couple of rules, you may not want some of them to be affected by others. If that’s the case, add the Stop Evaluating Rules action as the final action for the rule.
One last tip: You can duplicate any rule by selecting it and clicking the Duplicate button on the right of the window. Don’t forget about this feature—it’s often quicker to duplicate and modify a rule than to create a new one from scratch.
This nugget of info is from my “Working Smarter for Mac Users” newsletter. You can sign up for free and get free timesaving tips, and more, every week.
FX Photo Studio CK adds stunning effects to your photography