
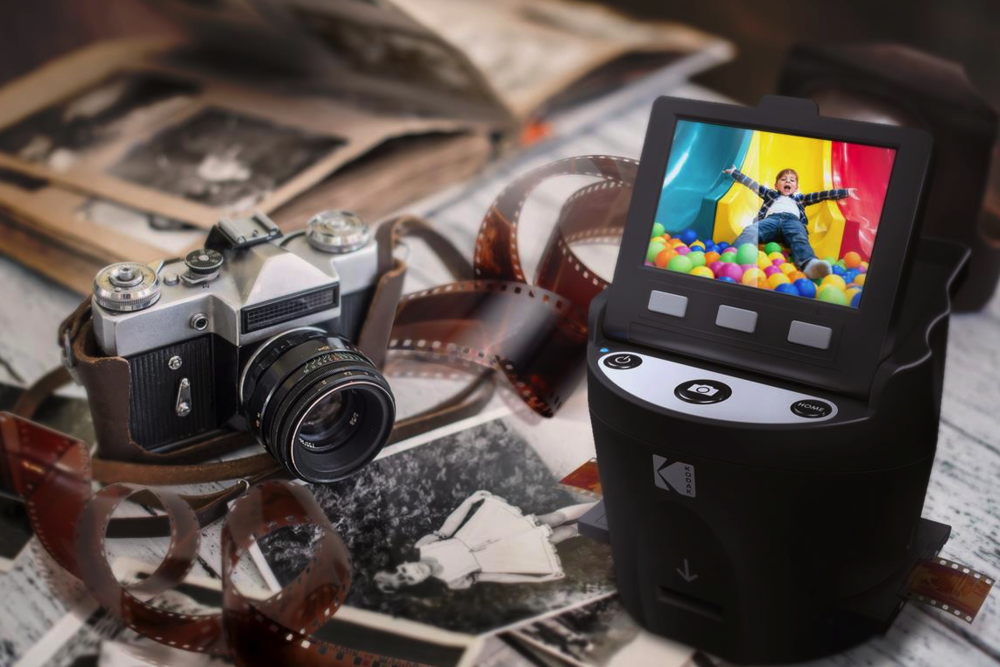
For those of us who are a bit older than the average, there’s a problem — while our newer photographic memories are captured in digital format, the older photos were taken on film in the form of negatives that were usually printed or in slides. There are services that provide scanning of these images, but they’re expensive, and many older methods of scanning slides were slow and of limited quality. That’s all changed with the new KODAK SCANZA film scanner (US$169.99, Amazon affiliate link) from KODAK licensee C+A Global.
Design
The design of the SCANZA is perfect for sitting down and digitizing a pile of slides or negatives in one session. It’s a small (5.1 x 4.7 x 4.5 inch / 12.95 x 11.94 x 11.43 cm) device with a bright 3.5-inch LCD color display on top, and various openings around the bottom to accommodate film/slide adapters.
The adapters provide an easy way to feed in 35mm, 126, 110, Super 8 and 8m negatives and slides which can then be viewed on the screen to ensure proper alignment before capture. The images are captured with a 14-megapixel sensor, which is higher resolution than most smartphone cameras and even a lot of DSLRs.
On the back of the unit are plugs for AC (a standard USB power cable and AC adapter are provided), an HDMI port if you wish to view the scanned images on a TV, and a film cleaning brush.

There’s also an SD card port, and here lies the brilliance of the SCANZA film scanner. Rather than relying on troublesome and often out-of-date scanning drivers, the SCANZA scans directly to SD card for easy transfer to Mac or iOS devices. Just for test purposes, I connected the SCANZA to my Mac using the USB Upload option, but although it showed that the scanner was connected to my Mac the computer never recognized it. It’s just easier to scan to a card, then insert the SD card into the card slot (on an iMac and other compatible Macs) or a card reader.
Function
I’ve tried various film scanning methods in the past, and was usually frustrated right out of the box by Mac-incompatible drivers. Since the SCANZA saves everything directly to SD, I just set up the scanner on a table, grabbed a tray of 140 35mm color slides, and went to work. There’s a power button on top of the unit that turns on the display, and there you’re presented with a clean and simple-to-use user interface.
The user interface has three primary buttons — the power button, a “camera” button to capture a scan, and a Home button. Three buttons above that provide navigation as directed by the screen. Several of the UI screens can be viewed in the gallery below.
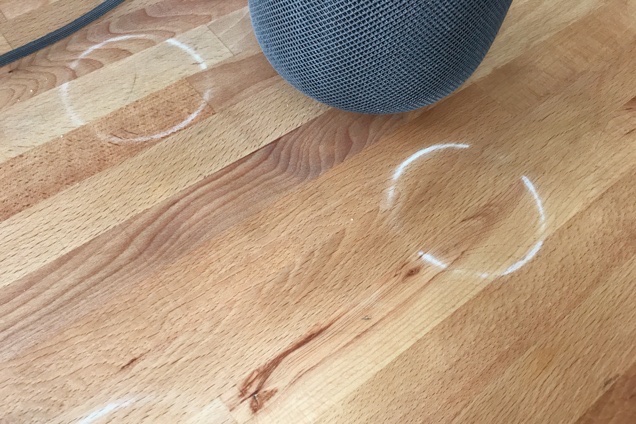
The silicone attached to the bottom of the HomePod reacts with oil-coated wood as a result of sound vibrations, leaving a white “footprint.” On the bright side, the problem probably wont be costly or time consuming to fix. Cesar Viramontes, a Senior Industrial Designer at Y Studios, a San Francisco based firm that has worked on everything from TV set top boxes to digital picture frames, told Business Week that the white ring problem should be fixed in the next round of manufacturing.
Still, Apple “should have caught the issue if they followed a rigorous QA process,” Ignazio Moresco, a product design expert who has worked at frog design, Microsoft and Ericsson. told Business Week.