

Today is the day — September 17, 2018. While this is not a day that will probably stand the test of time as being a historic date, it IS the day that iOS 12 is released to the public. In this short tutorial, you can learn how to download and install iOS 12 on your favorite iOS device — iPhone, iPad, or iPod touch.
Can My Device Be Updated?
The first thing to do is make sure that your iOS device can actually be updated to the latest version of the mobile operating system. Apple published a hardware compatibility list that shows exactly what models of iPhone, iPad, and iPod touch can be updated:
iPhone
-
iPhone XS
-
iPhone XS Max
-
iPhone XR
-
iPhone X
-
iPhone 8
-
iPhone 8 Plus
-
iPhone 7
-
iPhone 7 Plus
-
iPhone 6s
-
iPhone 6s Plus
-
iPhone 6
-
iPhone 6 Plus
-
iPhone SE
-
iPhone 5s
iPad
-
12.9-inch iPad Pro 2nd generation
-
12.9-inch iPad Pro 1st generation
-
10.5-inch iPad Pro
-
9.7-inch iPad Pro
-
iPad 6th generation
-
iPad 5th generation
-
iPad Air 2
-
iPad Air
-
iPad mini 4
-
iPad mini 3
-
iPad mini 2
iPod touch
-
iPod touch 6th generation
Just because Apple says that a device like the iPad mini 2 can be updated to iOS 12 doesn’t mean that it’s going to be able to do everything that’s built into the new operating system; some older devices simply don’t have the hardware to be able to do the job. For example, my test iOS 12 device — an iPad mini 2 — can run the operating system, but it runs very slowly and can’t do things like Memoji. Think before you update; older devices may be better off with the current iOS 11 operating system.
Preparing your device for iOS 12
Before you “push the button” to update your iPhone or iPad to iOS 12, make sure you’re ready. By “ready” I mean that you’ve cleaned up your device, updated your apps, backed it up, and — if you took part in the beta program — opted out of the beta software profile.
By cleaning up, I mean making sure that you have sufficient storage to install the new operating system. iOS 12 will require anywhere from 2 to 3GB of free space for installation. Now, the installer can actually offload apps temporarily to free up space, but I find that it’s a good idea to just go through my devices and eliminated those apps that are either outdated or aren’t used frequently.
On your iPhone, iPad or iPod touch, launch Settings, then tap on General and then iPhone/iPad/iPod Storage (the name depends on the device type). iOS provides a handy set of recommendations that can open up a surprising amount of storage on a constrained device. The screenshot below shows some of the recommendations, like enabling “Offload Unused Apps,” “Review iTunes Videos” and so on.
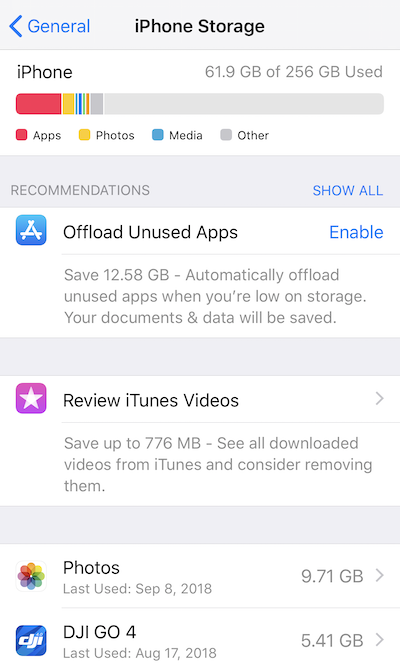
Each app on your device is listed below the recommendations, with each app showing how much storage is used. I fly DJI drones, and the DJI GO 4 app is pretty small — only 557.7MB in size. However, over the past months I’ve managed to save 4.85GB of flight records and images! While the 256GB iPhone X has no problems with storage, an iPhone with less (like 16 or 32GB) storage could free up almost 5GB by deleting the app.
Many apps provide two alternatives when you tap on the storage listing: Offload App and Delete App. Offload App just frees up the storage used by the app buy keeps the documents and data so the app is ready to run when it is reinstalled at a later date. Delete App deletes the application and erases all related app data.
Also be on the lookout for a label that says “Never Used” below an app in the storage listing. I use GarageBand frequently on my Macs, but never use it on my iOS devices. By removing GarageBand, I can free up 1.57GB of storage.
Update All Apps
Many developers have spent the last three months adding new features to their apps that take advantage of iOS 12’s new technology. By updating all apps that have an available update before you update to iOS 12, you can immediately take advantage of all the new features.
It’s a great idea to set up automatic downloads of updates in Settings, so they don’t usually need to wait for update files to be downloaded. To set this up on your iOS device, tap Settings > Apple ID > then iTunes & App Store. Below your Apple ID is a list of items that can be automatically updated — just tap the button on the right side of those items to enable automatic downloads.
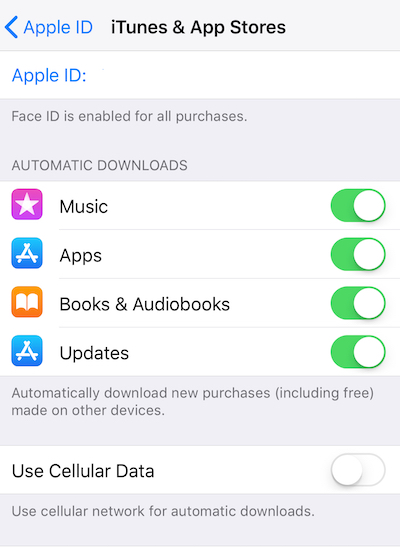
You’ll note that I also disable Use Cellular Data for automatic downloads, since it can keep me from running over my cellular data limit. This setting forces your iOS device to download update files only when connected to a Wi-Fi network.
Back Up Your Device
Hopefully you’ve read many of our past screeds exhorting you to turn on iCloud Backup. Having this turned on means that every night your iPhone, iPad or iPod touch is plugged in and on a Wi-Fi network, it automatically backs up settings and data to iCloud.
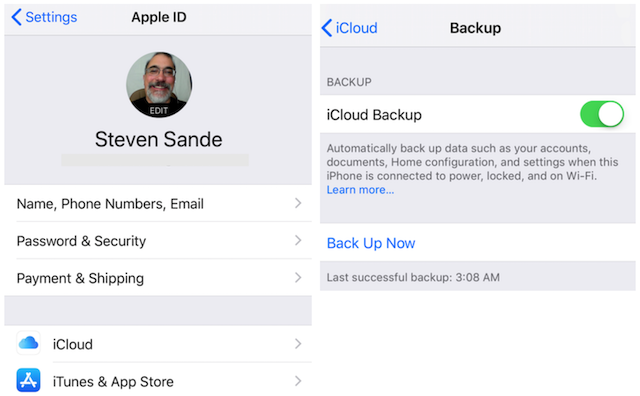
What? You don’t use iCloud Backup? Here’s how to start using it. Launch Settings, then tap on your Apple ID (that’s the top item in Settings that shows your name and the services you use). Tap iCloud, and a bar chart shows how much iCloud storage is available (don’t worry — you can buy more!). There’s also a list of apps installed on your device that use iCloud for data storage. Scroll down until you see “iCloud Backup”, and if the label on the right side says “On”, then the backup utility is turned on. To ensure that your iOS device is being backed up, tap on iCloud Backup and look at the last line — if it shows you that your last successful backup was in the last day or so, you’re ready to go.
If you don’t use iCloud Backup, you can also back up to a Mac using iTunes. Here’s how to do it:
1 – Using a USB to Lightning cable, connect your Mac and iOS device.
2 – Launch iTunes. You may see a dialog that asks if you want to allow the Mac to access information on the iOS device; if that happens, click Continue.
3 – When prompted, enter the passcode on your iOS device.
4 – Now look at the iTunes window again. In the upper left part of the window you’ll see a device icon for the iPhone, iPad or iPod touch you’ve connected to the Mac. Click that icon to see the summary screen for the device.
5 – Under the Backups heading on the summary screen, select This Computer to set the Mac as the location for the iOS device to be backed up to. It’s also good practice to check the box marked Encrypt iPhone (iPad/iPod touch) backup.
6 – If you’ve made purchases on the device that have not been backed up previously to iTunes, you’ll be prompted to transfer them to the Mac. Once again, this is a good thing to do …
7 – Click Back Up Now. Note that the backup can take quite a while to complete, and you should not interrupt the process.
Opt Out of the Beta Program
A lot of iOS users take advantage of Apple’s Public Beta program so that they can try the features of new operating system versions before the general release. If you’re on a public or developer beta version of iOS 12, it’s a really good idea to opt out of the beta so that you get the official Apple general release.
This is done by deleting the beta profile that’s installed on your device. Launch Settings, then tap General > Profile > iOS 12 Beta Software Profile. See the “Remove Profile” link in the screenshot below? Tap on it to opt out of the beta and you’re ready to install the official iOS 12 the minute it’s released.

Is The Update Available?
Is everything ready to go? Then it’s time to update to iOS 12! That is, if Apple has released the update… If all goes to plan, it will most likely appear at about 11 AM PT (2 PM ET). If you follow social media, you’ll know immediately when iOS 12 is available because everyone will be talking about it. For those of you who don’t follow social media, you can begin checking for the update around the time listed above. Simply launch Settings, then navigate to General > Software Update. Your iOS device contacts Apple’s servers to determine if an update is available, and if it is, you’ll see something similar to the screenshot below:
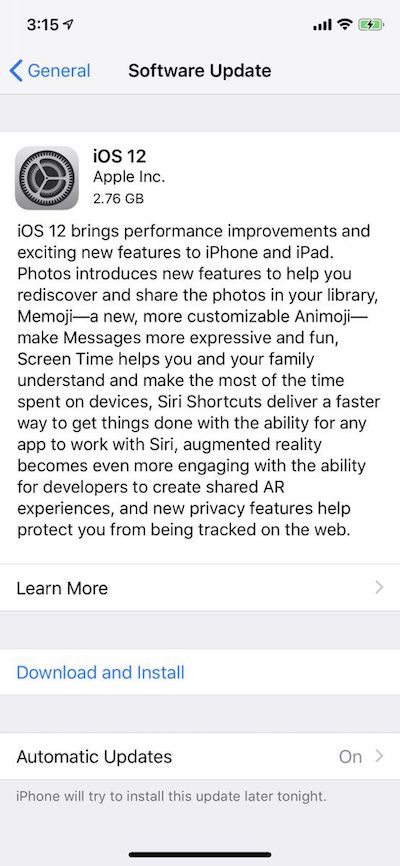
Provided that you’ve gone through our preparation steps, you can just tap Download and Install to begin the process. Make sure that your iOS device is on a Wi-Fi network, that it’s plugged in, and that it has at least a 50% charge when starting to update.
Once the update becomes available, a lot of people will be trying to update at once. This means that the download process can take an unusually long amount of time to complete. Don’t despair and don’t worry — eventually you’ll have the files downloaded to your iOS device, and it begins the update.
Be Sure You Know Your Apple ID and Password
You need to know your Apple ID and password to successfully complete the update. Many of us use these two key pieces of information every day so it’s not an issue, but if you rarely use your Apple ID and password, make sure you know what they are before you begin.
What if you forgot the password? Don’t worry — just point your favorite web browser to this Apple support page for instructions on how to reset your Apple ID password. This page even has instructions on what to do if you forgot your Apple ID.
Updating Through iTunes On Your Mac
There is another way to update your iOS device, and that’s by plugging it into your Mac. You’ll need to have the latest version of iTunes (12.8.0.150 as of September 17, 2018) installed.
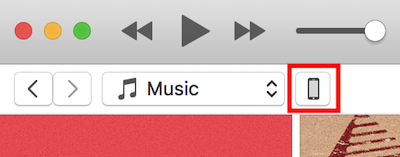
Use that USB to Lightning cable to connect the iOS device to your Mac and launch iTunes; you’ll need to wait for iTunes to recognize your device. That tiny iPhone icon outlined in red in the screenshot below shows that there is an iPhone attached:
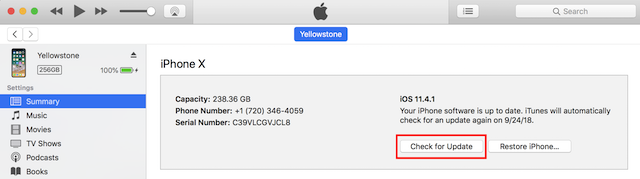
Now click the icon to see information about your device and the current operating system version. See that Check for Update button outline in red in the screenshot below? Click it to see if the iOS 12 update is available for download and installation. If the update is available, simply follow the on-screen instructions to download the update from Apple’s servers and install it on your device.
That’s it! Have fun, and enjoy the new features and apps of iOS 12