

Time Machine is one of the unsung heroes of macOS, automating the process of backing up your primary data drive to an external drive. It’s easy to use; just plugging in an external drive displays a dialog asking whether or not you’d like to use that drive for Time Machine backups. Restoring a failed drive from Time Machine is simple, too — just restart your Mac in Recovery mode (press Command-R during a reboot), then select “Restore from Time Machine Backup”. There’s only one problem with Time Machine; it runs hourly by default, and it can monopolize disk I/O and CPU cycles, bringing even fast Macs to a crawl. That’s why I’ll demonstrate a couple of utilities that adjust Time Machine’s backup schedule.
TimeMachineScheduler
TimeMachineScheduler is written and maintained by developer Stefan Klieme, and it works on every version of Mac OS X and macOS that includes Time Machine. Klieme’s web page doesn’t show compatibility with macOS 10.13 High Sierra, but it does work.
There are actually two versions of TimeMachineScheduler that are available. One works with macOS Sierra and High Sierra, while another version works with older versions of OS X. For those who have older Macs running old versions of Mac OS X, the old TimeMachineScheduler should work just fine.
The old version runs as a preference panel in System preferences, allowing you to change the backup interval from the hourly default up to once every 12 hours in hourly increments. There are settings for skipping a backup between certain hours, which is useful for those who need to run CPU and disk-intensive apps on their Macs. Additional settings can run a backup at startup or automatically mount a backup volume.
The newer “beta” version (4.0) is a standard Mac application, not a preference panel. It works identically to the older version, with the added ability of being able to run an AppleScript before or after a backup is run.
Here’s how to use TimeMachineScheduler with macOS High Sierra:
1 – Download TimeMachineScheduler from the web page.
2 – You’ll find the download in the Downloads folder as a file named “TimeMachineScheduler_4.0b8.dmg”. Double-click the disk image file to mount and open it.
3 – Install the application by dragging the TimeMachineScheduler icon to the Applications folder alias. You will be asked to enter your administrator password.
4 – Launch TimeMachineScheduler from the Applications folder.
5 – On the General tab, ensure that the scheduler is “installed and loaded” with a green indicator dot showing. If it isn’t loaded, click the Install button. You may see a temporary error message appear in red in the TimeMachineScheduler window.
6 – To change the backup interval, slide the Backup Interval slider to your choice between 1 and 12, then click the Apply button. Want to have a backup run as soon as the scheduler is loaded? Check the “Run Backup at Load” box. The screenshot below shows an example of the TimeMachineScheduler user interface:
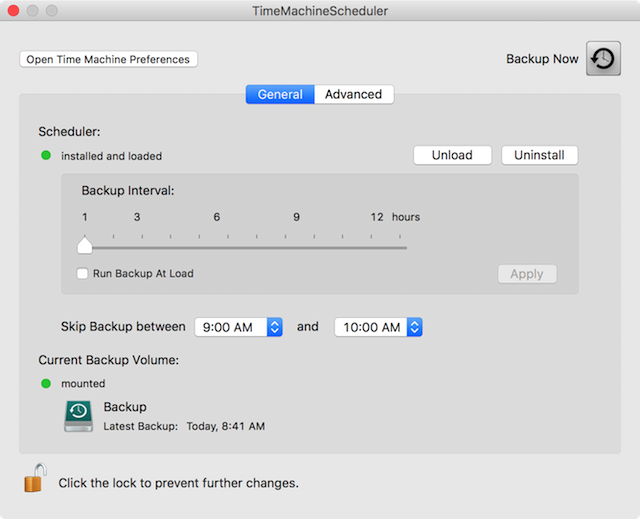
7 – Skipping backups during a specific timeframe is what the next line in the Scheduler user interface is for. Select a start and ending time, and no backups will run during that period. In the screenshot above, I chose to skip backups between 9 and 10 AM.
8 – Want to launch a Time Machine backup at any time? Click the big Backup Now button in the upper right corner of the TimeMachineScheduler window.
9 – The Advanced tab gives more advanced users a way to auto mount the backup volume or run AppleScripts before or after a backup.
TimeMachineEditor
Want something a bit more up-to-date than TimeMachineScheduler? TClementDev created TimeMachineEditor and it not only runs specifically on macOS versions as new as High Sierra, but also supports APFS local snapshots. TimeMachineEditor can let you set Time Machine to run when your machine isn’t being actively used, at certain intervals, or at calendar intervals (like on Wednesday and Friday at 9:30 PM). Here’s a short look at using TimeMachineEditor:
1 – Download TimeMachineEditor from its web page.
2 – TimeMachineEditor.pkg will be in your Downloads folder. Find it, then double-click the file to launch the installer. You’ll be asked to enter your administrator password. Follow the easy instructions and the app will be installed in your Applications folder.
3 – Launch TimeMachineEditor from the Applications folder.
4 – Want to have TimeMachineEditor schedule backups when your Mac isn’t being used? Click the “Back up” checkbox to select it, and select “When inactive” from the pop-up menu.
You can also select a time interval during which Time Machine backups won’t run. In the example screenshot seen below, I’ve set up Time Machine to not run between 8 AM and 4 PM.

Once a schedule has been set, click Apply to save the changes.
5 – Want to change the Time Machine backup interval from hourly to some other time period? Check the “Back up” box, then select Interval from the pop-up menu. You have a lot of choice, as intervals can be set between 1 to 999 hours, 1 to 999 days, or 1 to 99 weeks! The same “Do no back up” interval can also be set.
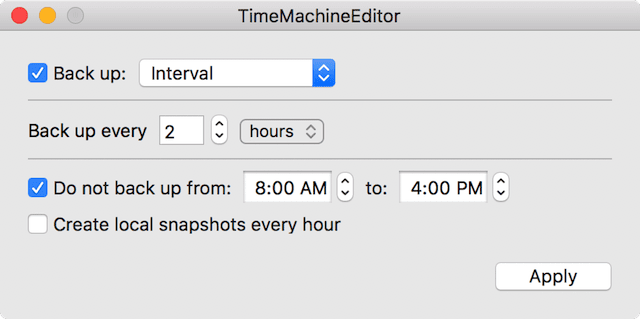
Click the Apply button to save changes in the settings.
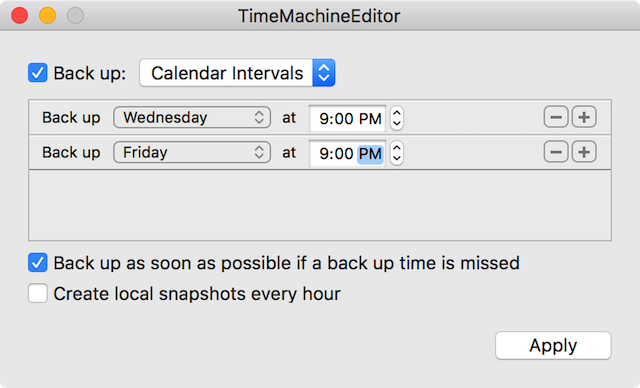
6 – Setting a calendar interval for Time Machine backups is easy to do as well. Check the “Back up” box, then select Calendar Interval from the pop-up menu. In the next image, you see that I’ve added a pair of Time Machine backups – every Wednesday and Friday night at 9 PM. I’ve also checked the “Back up as soon as possible if a backup time is missed” box to ensure that a backup will run.
7 – Running APFS (Apple File System) on a new SSD-based Mac? You can use TimeMachineEditor to do an APFS local snapshot each and every hour. This is a way to use one of the best features of APFS to assist in backing up your Mac. That snapshot is a read-only instance of the file system that’s created at a particular point in time.
Like this article? Consider supporting Apple World Today with a $5 monthly Team AWT membership.