
If you have a HomePod and a Mac and want to use them to their full combined potential, you need Rogue Amoeba’s $29 Airfoil for Mac.
As I mentioned in my review of Apple’s wireless speaker, when playing the 1996 action thriller, Broken Arrow on the iMac in my home office, I wanted to play the audio on the wireless speaker. However, when I clicked the AirPlay icon at the bottom left of the screen, the only device I could select was my Apple TV. No HomePod icon appeared. It’s not as convenient as simply using AirPlay would be, but Airfoil does allow me to play movie audio on the HomePod — and it does lots of other nifty things, as well.
But let’s back up. The Rogue Amoeba app lets you stream any audio from your Mac to just about any device connected to your network. The HomePod is, by default, tied into Apple’s ecosystem. However, Airfoil allows you to send music services like Spotify or web-based audio like Pandora wirelessly to the HomePod, Apple TV, Google Chromecast, and Bluetooth speakers. Heck, you can even send audio to iOS devices and other computers.
In addition to the HomePod, I’ve tried Airfoil with multiple Macs and two different Apple TVs. Everything played in perfect sync, even between different speaker types. Well, with one exception. More on that a moment.
But back to the HomePod/Mac combo. With Airfoil, you can play audio on your desktop or laptop, then use Airfoil to send it along. The HomePod doesn’t have a line input port, but anything you can play on or through your Mac can be passed wirelessly to the wireless speaker.
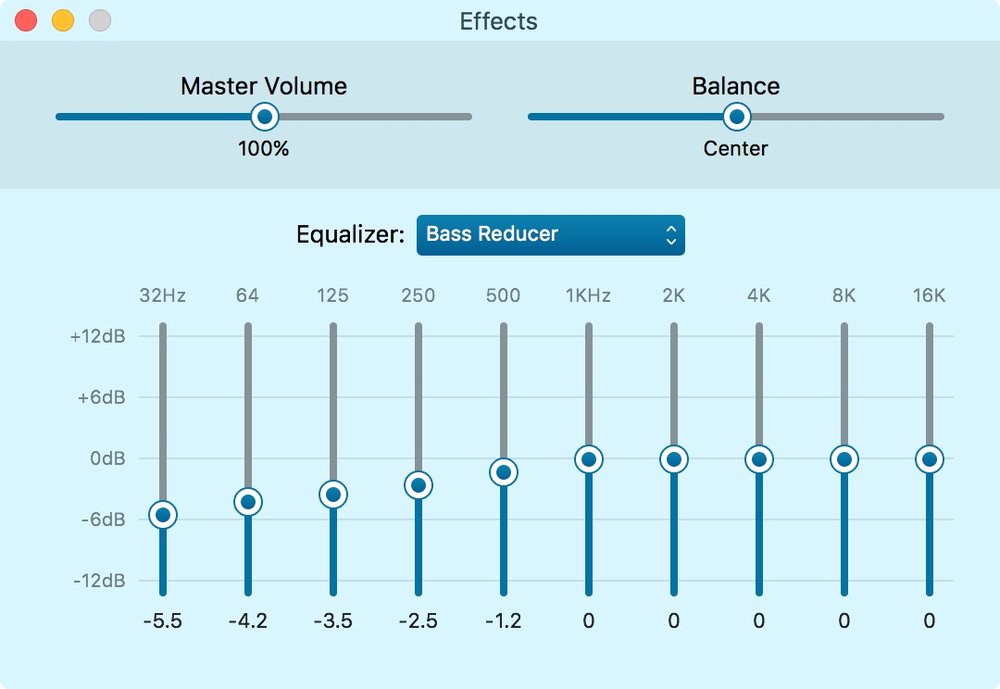
Also, Airfoil packs a built-in equalizer so you can tweak your audio to your tastes. For instance, you can use the Bass Reducer to tone down the HomePod’s bass if you wish. Or crank it up if you really want the joint jumping! Airfoil’s equalizer includes almost two dozen presets, and you can create and save custom presets.
You can choose to have Airfoil reside exclusively in your menu bar, just in Mac’s Dock, or both. I choose the latter because some features are only available by clicking on the app’s Dock icon (something I hope will change in future versions).
For instance, the equalizer feature only appeared when I clicked on the Airfoil icon in the Dock, then selected the Window tab.
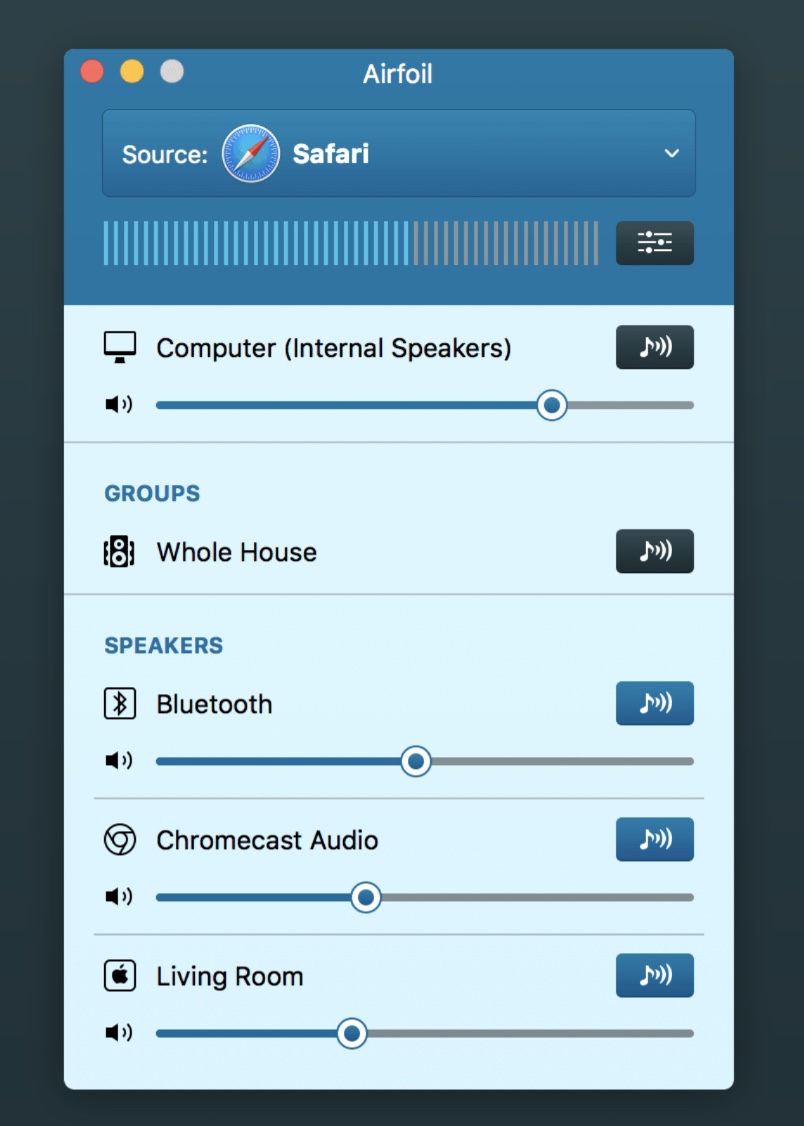
This is Airfoil’s “main” tab. and contains all of the app’s controls. Airfoil continuously scans your network to find and show any available output devices to which it can send audio. You select an input source from the Source popup at the top of the window, then click the Transmit button next to each output you’d like to hear audio through.
From the main window, you can also adjust the volume at which audio is sent to each output and view audio activity for Airfoil’s currently-selected source with the level meters. All available outputs appear in Airfoil’s main window by default. At the top, you’ll always see the Computer output, which enables you to play audio locally in sync with remote speakers. Below that will be Groups, if you’ve configured any. The last section contains individual remote outputs — all the supported devices that are visible on your local network.
A speaker group makes it possible to send to multiple outputs at once, with a single click. For instance, you might make one group for all the speakers on the first floor of your home, and another group for all the speakers on the second floor. When you click the Transmit button for a group, all the speakers in that group will be activated. Click it again, and they’ll all be turned back off.

You can still adjust individual speakers within a group, toggling them off or on individually, and adjusting their volumes. One glitch I found: when I tried to create a group comprised of my iMac and HomePod, it didn’t work. The goal was to see if I could have audio playing in front of me (the Mac) and behind me (the HomePod). Though I could add both devices to the group, the audio only played through the wireless speaker, not my iMac’s built-in speakers.
If you choose to show Airfoil in the menu bar, Airfoil’s global menu will provide access to its settings from any app. By default, you’ll see the icon for the global Airfoil menu in the upper right of your screen. The menu also shows information on what’s currently being transmitted by Rogue Amoeba’s software. Use the global menu to adjust and control Airfoil from anywhere on your Mac.
Enable the “Hide Speaker” feature by clicking its checkbox, and you can prevent an output from appearing in Airfoil’s main window. That’s handy you regularly connect to a shared network which contains device you don’t control. Turn that checkbox on, and they’ll no longer clutter up the main output list.
There’s also an Advanced Speaker Options window that displays statistics for the current audio transmission to each active output. These can be handy for debugging problems.
If you see a high attempted recovery number, or a high percentage in the Advanced Speaker Options window, Airfoil is having problems reaching that device. This occurs when there’s an issue on your network itself. You may need to move your Wi-Fi router, or add some network extenders. You can access more preferences can be accessed from the Airfoil menu. Options include:
Play Local Audio Through: This setting adjusts the audio device through which audio from Airfoil’s Computer output plays.
Allow remote speakers to connect to Airfoil: With this setting on, Airfoil Satellite will be able to request that Airfoil send it audio. You can activate audio from where you want to hear it, instead of from Airfoil itself.
Allow remote control of Airfoil and audio sources: When this is active, commands can be passed from remote speakers to and through Airfoil. This enables a helper app called Airfoil Satellite to control Airfoil, toggling outputs on and off, adjusting their volumes, and even switching the selected audio source (more on Airfoil Satellite in a sec). As well, supported sources will be controllable, enabling you to remotely pause audio, skip tracks, or go back.
Automatically Check for Software Updates: With this option activated, Airfoil periodically compares itself to the most current version available from our server and alerts you when a new version is available.
Automatically Transmit To: When launched, Airfoil will immediately begin transmitting audio from the last selected application to the selected speakers. To turn off automatic transmission of audio, just uncheck any and all boxes.
Silence Monitor for automatically disconnecting from all speakers after X minutes: Turn this control on to force Airfoil to disconnect from any outputs if it streams silence for the specified time. This can be useful in situations where multiple people send to an output. Ordinarily, if a user forgets to disconnect, other users will be prevented from sending audio to the output. This setting will automatically disconnect the user after the specified time, enabling others to connect.
The latest version of Airfoil for Mac (5.7) can work in tandem with Downcast, a $2.99 app available at the Mac App Store. This serves up includes metadata with its stream, so you can see track titles and album art with compatible outputs. It also works with BeardedSpice, a free menubar app for macOS that allows you to control web based media players and some native apps with the media keys found on Mac keyboards. It is an extensible application that works with Chrome (Canary, Yandex, Chromium) and Safari, and can control any tab with an applicable media player.
A free “Instant On” plugin is available from Airfoil’s Install Extras tab. It lets you grab audio from any source instantly with no need to quit and relaunch applications.
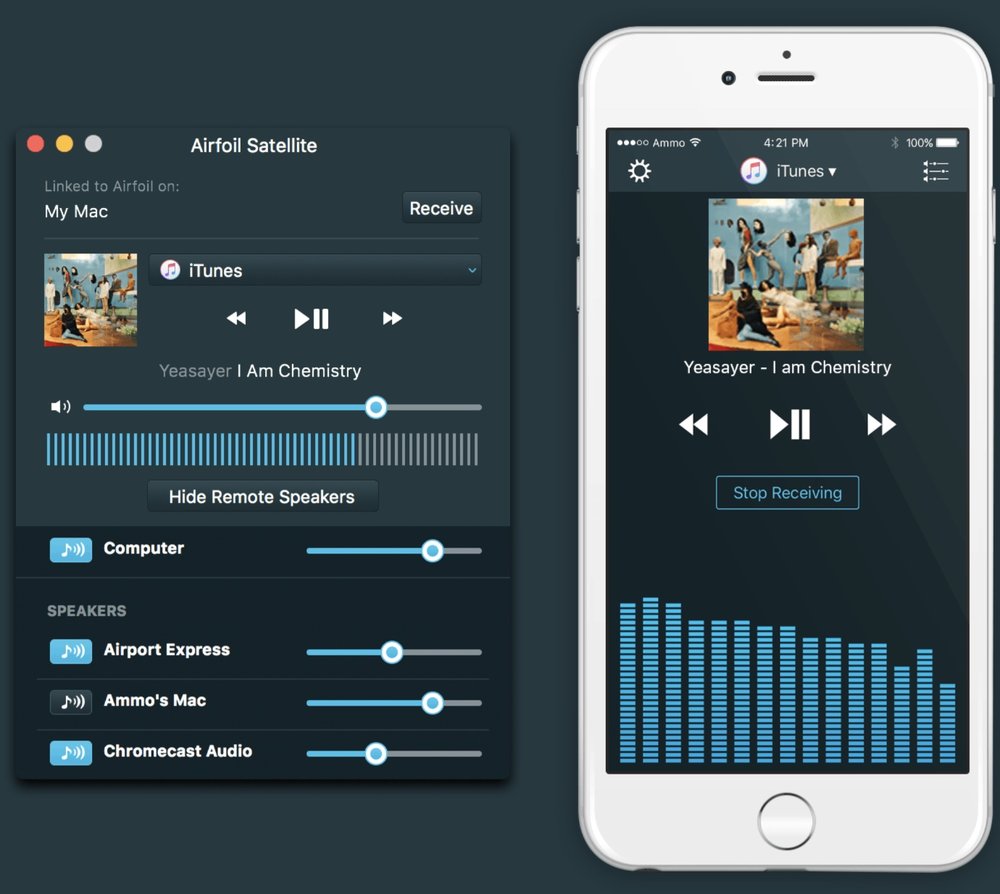
Then there’s Airfoil Satellite. It’s a free companion for Airfoil, available for iOS, Windows, and Mac that allows you to receive audio and remotely control Airfoil on your iOS device or other computer.
With version 5.7, Airfoil for Mac can even receive direction directly from a HomePod. That means you can use “Hey Siri” or the volume buttons to adjust playback levels. You can also pass playback commands from the HomePod through Airfoil and on to supported sources. A single tap on the top of the HomePod will toggle play/pause, a double-tap will skip to the next track, and a triple-tap will jump back. Addressing Siri with these same commands works as well.
If you’re fortunate enough to have multiple HomePods (and I don’t), the folks at Rogue Amobea say you can use Airfoil to send to all of them at once, with playback happening in sync. Airfoil has long been able to play audio to multiple devices in sync, and playback to the HomePod is no exception. Apple has touted multi-speaker sync as part of their delayed AirPlay 2 protocol. No work on when that will happen, but it’s already possible now using Airfoil.
Apple World Today Rating (out of 5 stars): ★★★★★