

Most Mac users are happy to use the built-in web browser, Safari. It’s fast, it’s compatible and it is secure. Occasionally you may find a website that just doesn’t “play well” with Safari, at which time it’s not a bad idea to consider a second backup browser. Today I’ll take a look at how to move your settings and bookmarks to alternative web browser.
Safari alternatives
There are three major alternatives to Safari; Google Chrome, Mozilla Firefox and Opera Software’s Opera. Unsurprisingly, Microsoft does not make a version of its Edge browser for macOS — it chooses to keep that as a feature of Windows, although there is an iOS version available.
Each of these browsers has its own features and capabilities that set them apart from the others. I won’t go into a detailed comparison of the features of each browser, so if you want to see exactly what each touts as its “killer feature”, you should use the links in the previous paragraph to check them out.
Moving from Safari to Chrome
Google’s Chrome uses Google’s cloud for syncing bookmarks rather than using Apple’s iCloud, and it also features a large and growing library of powerful extensions that add features to the browser. To sync settings and bookmarks between computers, you will need to have a Google account — a Gmail address is sufficient. Using the Download Chrome button on the Chrome home page to load the installer on your Mac, follow the instructions to install Chrome into your Applications folder.
To move your existing Safari bookmarks to Chrome:
1 – Launch Chrome and log in with your Google account
2 – With Chrome open, select Chrome > Import Bookmarks and Settings

3 – Select the browser that you’re importing bookmarks and settings from. This is done with the pop-up menu seen in the screenshot above, which is currently pointing at “Safari”. Most of the time the browser to import from will be listed as Safari, but Chrome imports bookmarks and settings from many other popular browsers.
4 – Depending on the browser you’re importing from, there may be other options available. In the example of Safari, only favorites/bookmarks can be imported. Select available items that you wish to import by checking the box next to the item, then click the Import button.
5 – Chrome imports the bookmarks and other settings almost instantaneously, with a dialog showing that the work is complete.

After clearing the import dialog by clicking the Done button, Chrome defaults to the Settings page. That’s where you can continue to customize the browser to your needs. The bookmarks that have been imported are now synced to all devices using Chrome and the same Google account.
Safari to Firefox
Firefox was completely rewritten and re-released earlier this year, and it’s now one of the fastest browsers available for Mac. It’s arguably the best browser for those who want privacy during their web browsing sessions, and it’s available on all major platforms — Mac, iOS, Windows and Android.
To sync bookmarks and settings, you’ll need to sign up for a free Firefox account. Once the account is set up, users have a voice of what to synchronize between devices; open tabs, bookmarks, logins, history, add-ons, preferences, and even addresses.
1 – Launch Firefox, and log in with your Firefox account
2 – On the right side of the Firefox address and search bar is a button that looks like a stack of books on a bookshelf. Click it, then select Bookmarks from the pop-up menu.
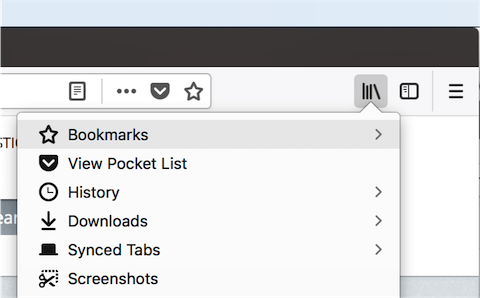
3 – Click on Bookmarks, then scroll to the bottom of the list and select Show All Bookmarks.
4 – The Library window opens, showing browsing history, downloads and any bookmarks created.
5 – Click the “Star” button, then select Import and Backup. Select “Import Data from Another Browser”

6 – This opens up the Import Wizard. Depending on the browsers that are currently installed on your Mac, you’ll see one or more listed in the Import Wizard.
7 – On the Import Wizard, click the browser you wish to import settings and data from, then click Continue. Select the items you wish to import, then click Continue again. The import is done quickly, at which time you should click Done to close the Import Wizard. For those who have more than one other browser on their Mac, be sure to run the Import Wizard for each browser if the bookmarks are different.
Safari to Opera
The Opera web browser has client versions for Mac, iOS, Windows, Android, and even Linux. For those who are installing Opera for the first time on a Mac, there’s a handy feature built into the installer — one of the defaults is to “Copy bookmarks and settings from the default browser”. As a result, once you’ve installed Opera all of the browser bookmarks and settings from Safari (or other default browser) are already listed.
However, sometimes you’ll find that you’ve moved to Opera but the bookmarks and settings aren’t what you wanted. You can import them from any other Mac browser:
1 – With Opera launched and open on your Mac, select Opera > Import Bookmarks and Settings from the menu bar.
2 – A dialog appears, showing the browsers that you can import bookmarks from. Select the browser, then check the boxes for any items you wish to import. Unlike other browsers, Opera can import “cookies”, which are those files created by websites and stored by your browser to keep information like your name, interests, and so on. If you don’t want to have your cookies moved over from another browser, deselect the Cookies check box. Once you’re ready, click Import, and the passwords and bookmarks are imported to Opera.

Other Browsers to Safari
Are you new to Mac and the Safari web browser? You will need to know how to import settings and bookmarks from Chrome, Firefox or Opera to Safari. It’s easy to do, just like you’d expect from an Apple product.
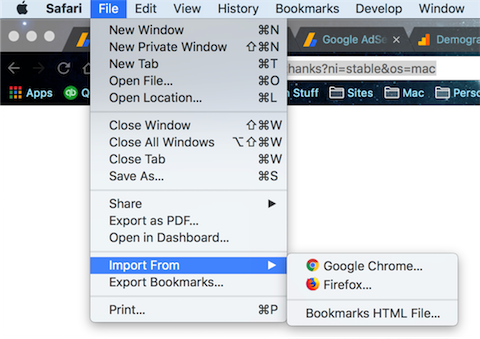
1 – With Safari launched, select File > Import from the menu bar. You’ll see a list of of other browsers installed on the Mac. Select tone of them to import bookmarks from.
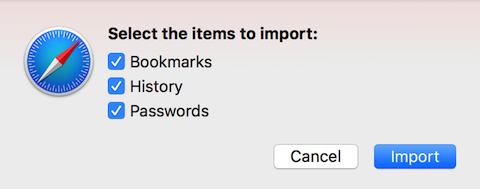
2 – Once you’ve selected the browser, a small dialog appears showing check boxes for the items that are available for import from that browser. Bookmarks, History and Passwords are usually the items that are listed. Uncheck items you don’t want to import, then click the Import button to proceed.
3 – In the screenshot under step 1 of this section, one of the items that can be selected for import is a “Bookmarks HTML File”. This is useful if you’re using to the Mac from a PC. Before you shut down the PC, go into the PC browser — Internet Explorer, Microsoft Edge, Chrome, Firefox or Opera — and find the menu command that allows you to export bookmarks as an HTML file. Next, save the file to a USB flash drive or send it to yourself via email. When you’re setting up your new Mac and open Safari for the first time, use “Import From > Bookmarks HTML File” and select the HTML file you created.
Like this article? Consider supporting Apple World Today with a $5 monthly Team AWT membership.