
Think of Clips, Apple’s new, free app that allows iPhone and iPad users to create “expressive videos,” as “iMovie Lite.” It lets you combine video clips, photos and music into videos to share through the Messages app, or on Instagram, Facebook and other social networks.
Clips is easy to use — once you get the hang of it, as menu layouts are a bit confusing at first. And the pretty-but-unhelpful introductory video is more like an ad than a tutorial. Once you open Clips, you’re presented with interface with an empty timeline at the bottom of the screen.
You touch and hold the Record button to … well, record. You can record video, or snap a still frame and then zoom in for a closer look. To get started touch and hold the Record button.

In my first several experiments with Clips, it seemed you had to keep holding down the Record button to record or even import a video. Eventually, I discovered that you can swipe left on the giant red “Hold to record” button if you’re going to be filming for awhile; this locks the camera in recording mode. Just tap the button again when you want to stop shooting. To create a new video, tap the downward pointing arrow icon at the top, then tap New Video (the “+” icon).
Clips defaults to the Instagram-esque square format, so if you’re importing media, if it doesn’t look good square, it’s not going to look good in your project. For photos, tap once, then tap and hold to determine how long the pic stays onscreen. You can use the front or rear camera, toggle flash for photos, and toggle audio in video clips.
To open a video, tap the downward facing arrow, tap a video, then tap Open. To delete a video, tap the downward facing arrow icon, then touch and hold a video until an X appears. Tap X, then tap Delete Video to confirm.
To add a photo or clip from your library, tap Library, then tap a photo or clip. Touch and hold the Record button for the number of seconds you want the photo or clip to appear. To copy an image from a webpage, touch and hold an image in Safari, then tap Copy. In Clips, tap Photo or Video, touch and hold the image in the viewer, and tap Paste. Touch and hold the Record button for the number of seconds you want the image to appear. While recording a photo, a clip or photo from your library, or an image from a webpage, you can drag to pan, and pinch to zoom in or out.
You can add a voiceover while recording by speaking while you record. If you don’t want to record audio, tap to turn off audio recording.
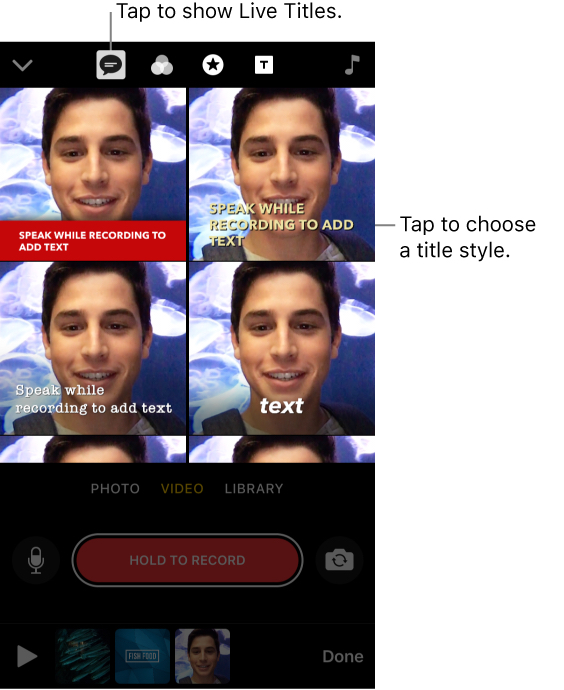
Speaking of audio, you can add animated “Live Titles,” a feature that lets you create animated captions and titles using just their voice. Effects including comic book filters, speech bubbles, shapes and full-screen animated posters.
As you speak, captions appear on the video, timed to your voiceover. Tap the Live Photos icon,

then tap a title style, touch and hold the Record button, and start speaking. Speak faster or slower to control the timing of your title.
Live Titles works pretty well, but has its quirks. Sometimes it mistranslates words or drop them entirely. And, like Siri, it’s sometimes confused by my Southern accent.
To turn off the feature, tap the Live Titles icon, than tap None. To change the style, tap the icon, then tap a style.
With Live Titles. you can mix and match different styles, and tap any title to adjust text and punctuation, or even add inline emoji. The feature supports 36 different languages.
To edit Live Titles text, tap a clip with Live Titles tap the forward button, wait until text appears, then tap the pause icon.
Tap the text to edit it, then tap Apply. To turn your voice on or off, tap the microphone icon. You can tap the microphone icon before recording to turn off the sound of your voice. The Live Title still appears, but without your voiceover.
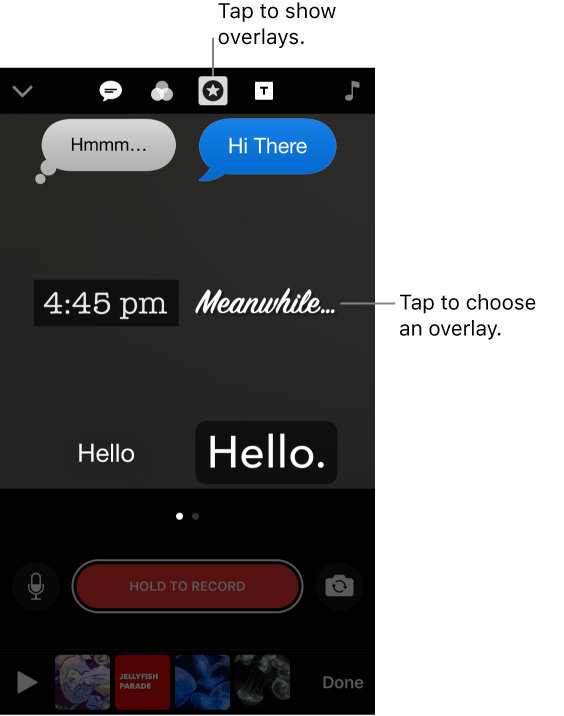
You can add artistic filters, text banners, speech bubbles, shapes or emoji. You can also add full-screen posters with animated backgrounds and customizable text. Tap the start button, then tap an overlay. Swipe left to view emoji.

You can turn on a filter to add it while you record, or you can add a filter to an existing clip in your video. You can also turn on a filter before adding a photo or clip from your library, or an image from a webpage.
To turn on a filter before recording, tap the Filter icon (three overlapping circles), then tap a filter. To turn off the filter, tap the Filter icon, then select None. To ad a filter to a clip in your video, tap a clip, tap the Filter icon, then tap a filter.
To add a filter to a clip from your library, tap Library, then tap a clip or photo. Tap the Filters icon, than tap a filter. Touch and hold the Record button to add the clip or photo to the filter. To remove a filter, tap a clip with a filter, tap the Filters icon, then tap None.
To add an overlay, tap the Overlay button (a star inside a circle), then tap an overlay. Swipe left to view your recently used emoji. After you add an overlay, you can drag it, rotate it, or pinch to resize it. If you don’t see the emoji you want to use, add another one, select it, then use the standard emoji keyboard to choose any other emoji.
To edit overlay text, tap an overlay (or tap a clip with an overlay), tap the text to edit it, then tap Apply. To delete an overlay, tap a clip with an overlay, tap the overlay, then tap X in the corner.
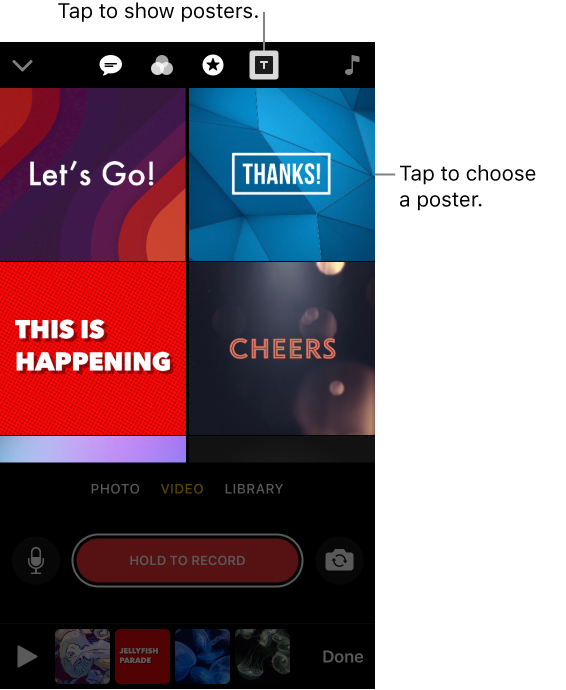
Posters are animated title screens you can add to your video. To add a poster tap the T icon, then tap a poster. Touch and hold the Record button for the number of seconds you want the poster to appear. You can use 3D Touch and press a poster style to preview its animation.
To edit poster text, tap a poster style (or tap an existing poster clip in your video), tap the text to edit it, then tap Apply. To remove a poster, tap a poster clip at the bottom of the screen, then tap the trash can icon.Video thumbnails that start with posters don’t show anything except the poster color
One complaint: Video thumbnails that start with posters don’t show anything except the poster color.
You can add music from your library or from a selection of built-in soundtracks. Clips has dozens of music soundtracks to choose from, and they automatically adjust to match the length of a video.
To add or change a soundtrack: Tap the musical note icon, then browse soundtracks. Tap a soundtrack to preview it with your video. Tap a soundtrack again to select it, tap the back facing arrow, then tap Done.

To add or change songs from your library: Tap the musical note icon, then browse songs. Tap one to select it. To preview the song with your video, tap the play icon, then tap Done. Songs from your library aren’t automatically adjusted to fit the length of your video. To choose the portion of the song to use, drag the waveform. To remove music, tap the musical note icon, tap None, then tap Done.
You should note that the amount of audio editing you can do is limited. Also, captions and audio can only be recorded when clip is added.
To reorder clips, touch and hold a clip until it floats, then drag it left or right.
To silence a clip, tap it, then tap the sound icon. To hear the sound again, tap the mute icon.
To trim a clip, tap it, then tap the scissors icon. Drag the start and end markers to set the beginning and end of the clip, then tap Apply.
To delete a clip, tap it, then tap the trashcan icon. Tap Delete Clip to confirm.
To save a clip to your library, tap it, then tap the save icon (a downward arrow/line). Video clips and photos you create in Clips do not automatically appear in your library, as you would expect they would.
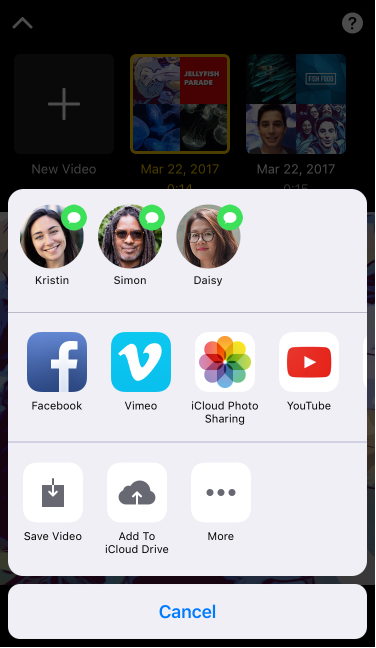
Videos made with Clips can be shared directly to social networks and video websites, including Instagram, Facebook, YouTube, Vimeo and more. When sharing with friends in Messages, Clips can suggest who to share with based on the people who appear in the video, and the people a user shares with most often. When a suggested name is selected, Clips inserts the video right into Messages so it’s ready to send with one tap.
Though it’s not for serious video editing, once you’ve gotten the hang of Clips, it offers a quick way to make fun videos for sharing.
Clips is available on the Apple App Store. It’s compatible with the iPhone 5s and later, the new 9.7-inch iPad, all iPad Air and iPad Pro models, iPad mini2 and later, and iPod touch 6th generation. Devices must be running iOS 10.3 or higher.
Apple World Today Rating (out of 5 stars): ★★★★