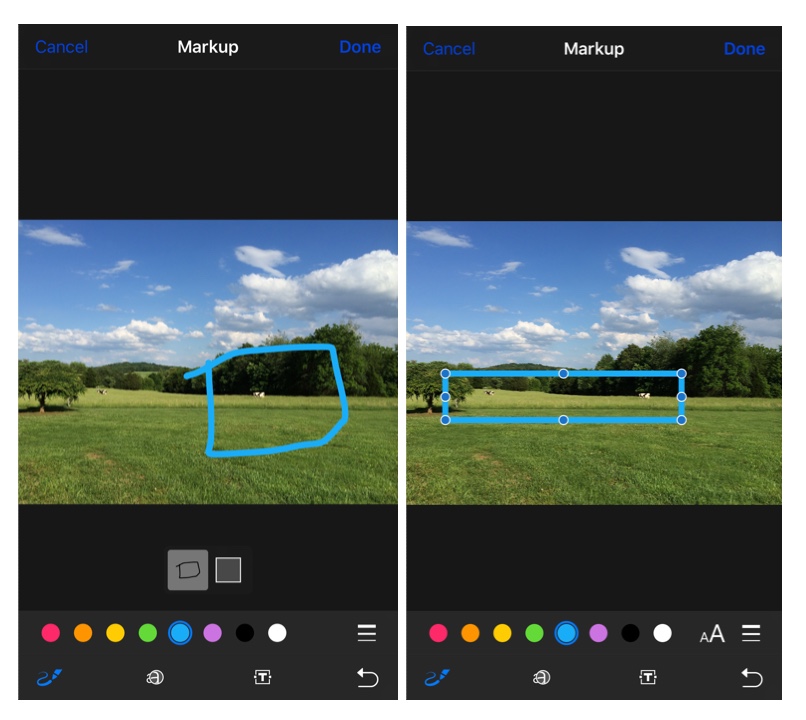
When sharing photos with others, I often like to put a box or circle around something I want to point out. Sometimes I like to include an arrow highlighting a feature in a photo.
The stock Photos app in iOS has a great tool for drawing perfect geometric figures on your photos. With Photos I can draw a shape freehand and use it. If you are like me, the shapes I draw upon the screen are not very attractive. The software can determine what shape I was trying to draw and, at the lower part of the screen, offer two options: my original shape or what the photo app thinks I was trying to draw.
You can access the markup options by tapping on the three lines with circles located at the bottom of the photo. Then tap on the circle with the three dots. Choose “Markup.”

At the bottom you have options for color selection. Below that you have four options: drawing a shape, lens magnification, overlaying text, and undo. In this brief tutorial I’ll focus only upon drawing a shape.
The first step is to choose the color you want. The drawing tool should be selected and in blue. If not, tap on the drawing tool which looks like a marker drawing a line.
Then simply draw the shape on the photo. If you draw a shape closely resembling something the app recognizes, then, at the bottom, you will be given two choices: your drawing or a well-defined shape the app thinks you are trying to draw.
If you tap on the box to the right, choosing the shape the app suggests, you will have a perfectly formed shape with handles to resize or shape it further. You can press on the shape and move it to place it somewhere different on the photo. When you are finished, simply tap on an open space on the photo. If you like what has been done with the photo, tap “done”; otherwise tap “cancel.”
In the photos included here, I have a picture of the farm behind our house. In the photos are a couple of cows that I wanted to point out.

In another article I’ll cover the other tools of iOS photos markup.

